 Pin This
 My grandmother kept a ceramic dish in her kitchen cabinet that only came out for special occasions, and somehow I always knew when banana pudding was on the menu just from seeing that particular bowl on the counter. There's something about the way vanilla wafers soften into the pudding, creating layers of texture that shouldn't work together but absolutely do. The first time I made it myself, I was terrified of the custard breaking, but my aunt sat at the kitchen table with her coffee and talked me through the tempering step like we had all the time in the world. Now when I make it, I think about how desserts like this one carry more than just sweetness—they carry moments.
I served this at a potluck where everyone brought something, and I watched a coworker take a first bite and close their eyes like he was somewhere else entirely. That's when I realized banana pudding isn't just about feeding people—it's about giving them permission to slow down and remember why comfort food matters. He asked for the recipe before he'd even finished his bowl, and I told him the real secret was taking your time with the pudding layer, which he did, and his version became his thing that he brings to every gathering now.
Ingredients
- Granulated sugar (3/4 cup): This sweetens the custard base without overpowering the vanilla and fruit flavors; I learned to whisk it with the cornstarch first to prevent lumps.
- Cornstarch (1/4 cup): The thickening agent that gives the pudding its silky consistency; don't skip the gradual whisking with milk or you'll have clumps.
- Salt (1/4 tsp): A tiny pinch that somehow makes everything taste more like itself, especially the vanilla.
- Whole milk (3 cups): The backbone of the pudding; I use whole milk because the fat creates that luxurious mouthfeel that skim milk can't quite achieve.
- Egg yolks (4 large): These enrich the pudding and thicken it further; tempering them is the one step that seems scary but becomes second nature.
- Unsalted butter (2 tbsp): Stirred in at the end for richness and a subtle depth that rounds out the vanilla flavor.
- Vanilla extract (2 tsp): Use real extract, not imitation; there's a difference in how it carries through the pudding after chilling.
- Vanilla wafers (1 box, about 45–50 cookies): These soften just enough in the pudding without dissolving into mush if you assemble and chill properly.
- Ripe bananas (4 medium): Slice them just before assembly so they don't brown; overripe bananas work fine if you like deeper flavor, but they'll get mushier.
- Heavy cream (1 cup): Whipped into clouds just before serving for contrast against the creamy pudding layer.
- Powdered sugar (2 tbsp): Sweetens the whipped cream without adding grittiness the way granulated sugar would.
Tired of Takeout? 🥡
Get 10 meals you can make faster than delivery arrives. Seriously.
One email. No spam. Unsubscribe anytime.
Instructions
- Mix the dry ingredients:
- Whisk the sugar, cornstarch, and salt together in a medium saucepan, breaking up any cornstarch lumps with the back of your whisk. This dry mixing prevents the starch from clumping when the milk hits it.
- Create a smooth base:
- Gradually pour the milk into the dry mixture while whisking constantly, making sure you reach into the corners of the saucepan where lumps like to hide. The mixture should look smooth and pourable before it touches any heat.
- Cook the pudding:
- Set the saucepan over medium heat and stir almost constantly until you see the first bubble break the surface and the mixture coats the back of a spoon, about 6–8 minutes total. You'll feel it thicken under your whisk, and that's when you know you're close.
- Temper the egg yolks:
- Lightly beat the egg yolks in a separate bowl, then slowly pour about 1/2 cup of the hot pudding mixture into them while whisking constantly to raise their temperature gently. This step prevents scrambled eggs in your pudding, which is not the texture we're going for.
- Combine everything:
- Pour the tempered yolk mixture back into the saucepan while whisking constantly, then cook for 2–3 more minutes until the pudding looks thick and glossy. Remove from heat and stir in the butter and vanilla extract until they're completely incorporated.
- Cool and chill the pudding:
- Transfer the pudding to a bowl, press plastic wrap directly onto its surface to prevent a skin from forming, and let it cool to room temperature before refrigerating for at least an hour. This step is worth not rushing because a warm pudding layer makes everything slide around when you try to assemble.
- Build the layers:
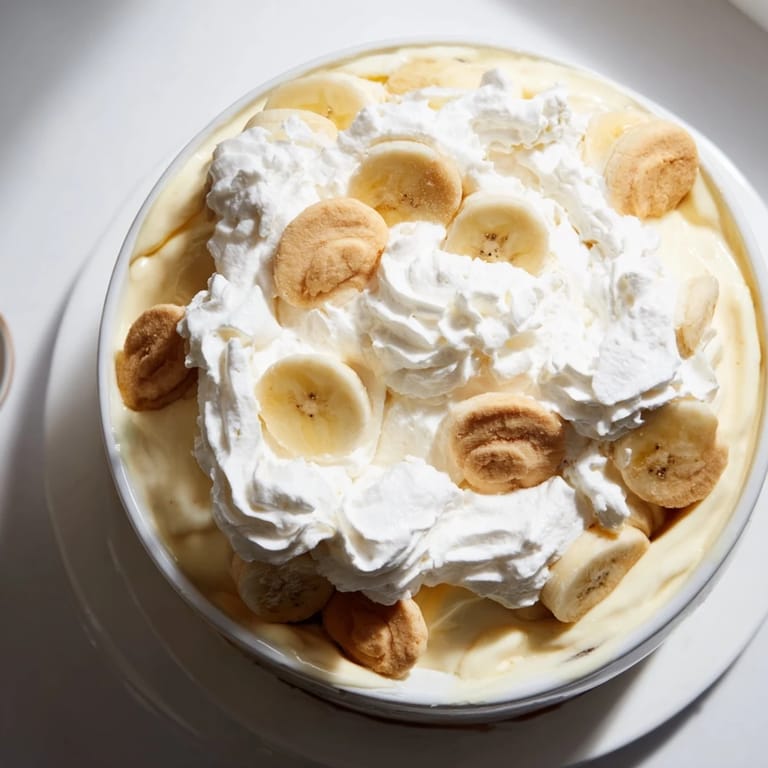
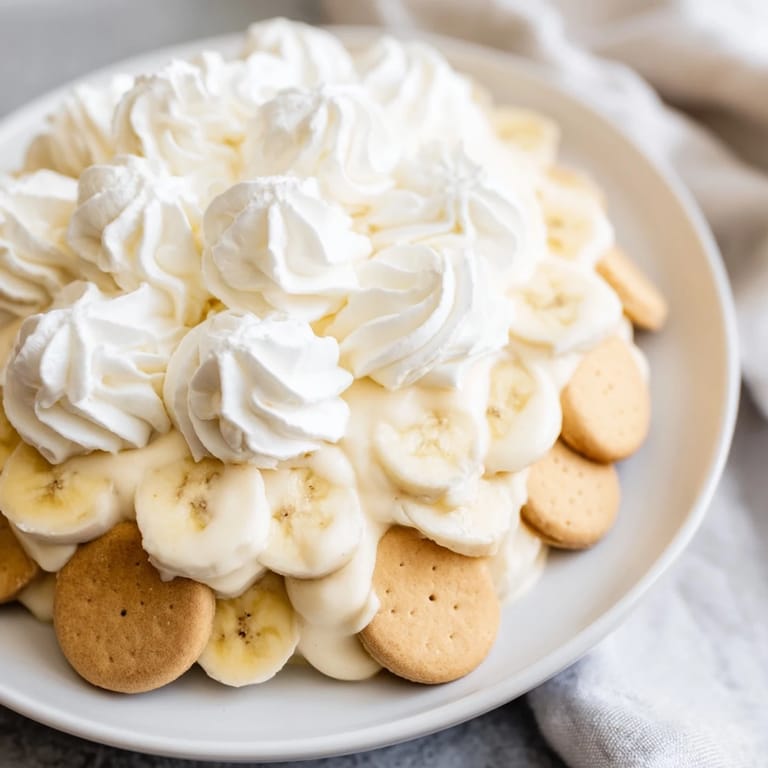
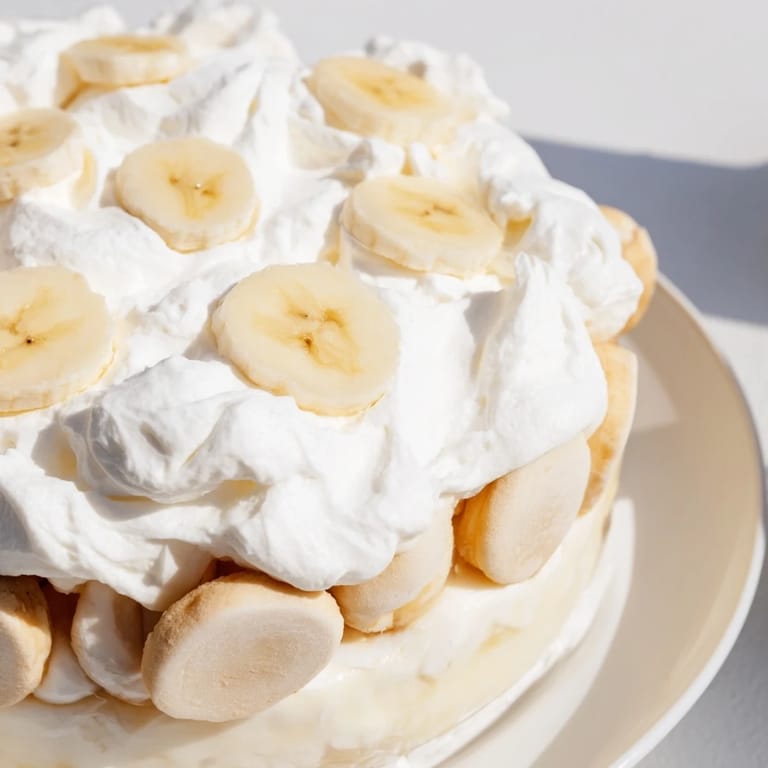
- In your serving dish, spread one-third of the vanilla wafers across the bottom, then scatter one-third of the banana slices over them, then spoon one-third of the chilled pudding on top. Repeat this pattern two more times, ending with pudding on the very top so you have a clean canvas for the whipped cream.
- Let it set:
- Cover the assembled pudding and refrigerate for at least 2 hours, which lets the wafers soften slightly and allows all the flavors to get to know each other. Overnight is even better if you can manage it.
- Whip and finish:
- Just before serving, whip the heavy cream with powdered sugar and vanilla extract until soft peaks form—this only takes a few minutes and makes the difference between a pudding that looks homemade and one that looks like you actually cared about presentation. Spread or pipe it over the top, and if you want to get fancy, lay a few extra wafers or banana slices on top.
 Pin This
 I remember my sister's kitchen on a humid summer afternoon when she insisted on making banana pudding even though the air conditioning was barely working, and somehow that cold, creamy dessert became the moment everyone stopped complaining and just sat around the table together. It's funny how food like this reminds you that the effort is about more than feeding people—it's about giving them a reason to stay.
The Magic of Tempering
The tempering step sounds more complicated than it actually is, and once you understand what you're doing—raising the temperature of the egg yolks gradually so they don't scramble—you'll use this technique in other custards and creams for the rest of your life. I spent years intimidated by this step until someone explained that I was just slowly heating the eggs up, not trying to do anything fancy, and that shifted everything. Now tempering feels like the easiest part because it's just patience and a whisk.
Texture and Timing
The reason banana pudding works so well is because it's built on contrasts: creamy pudding against crunchy wafers that soften just slightly, cold temperature against the warmth of vanilla flavor, and richness balanced by fresh fruit. The timing matters here because if you assemble it too early, the wafers disappear into mush, and if you serve it too late, the bananas start to brown and the whole thing loses its appeal. I've learned to think of the assembly as the start of a clock that counts down to serving time, usually around 4–8 hours later depending on the weather and how patient you can be.
Variations and Make-Ahead Wisdom
This recipe is forgiving enough to play with, though some changes matter more than others. You can use low-fat milk if that's what you have on hand, swap the whipped cream for a meringue topping if you want to bake it, or substitute the vanilla wafers with pound cake slices if you want something slightly richer. The one thing I wouldn't mess with is the pudding-making process itself, because that's where the recipe gets its soul, and every shortcut there shows in the final texture.
- Make the pudding up to a day ahead and store it in the refrigerator; assemble the pudding no more than 8 hours before serving to keep the wafers from getting too soft.
- If you're bringing this to a potluck, keep it in the refrigerator until the last possible moment and tell people to eat it within a few hours of arrival.
- Slice your bananas right before assembly or they'll oxidize and turn brown; this isn't a safety issue, just an aesthetic one.
 Pin This
 Banana pudding is one of those desserts that never goes out of style because it simply tastes like home, no matter where that home is. Make it once and you'll understand why people ask for it at every gathering.
Recipe FAQ
- → What type of bananas work best for this dessert?
Ripe but firm bananas provide the best texture and sweetness without turning mushy when layered.
- → Can I use a different type of wafer?
Vanilla wafers offer a classic flavor and crunch, but other light, crisp cookies can be used as a substitute.
- → How long should the pudding be chilled before assembling?
Allow the pudding to chill for about one hour to ensure it sets properly and layers hold their shape.
- → What is the best way to avoid lumps in the pudding?
Whisk continuously while heating and temper the egg yolks by slowly adding hot milk to them before combining fully.
- → Can this dessert be prepared ahead of time?
Yes, assembling and chilling for at least two hours enhances the flavors and texture; best consumed within 24 hours.